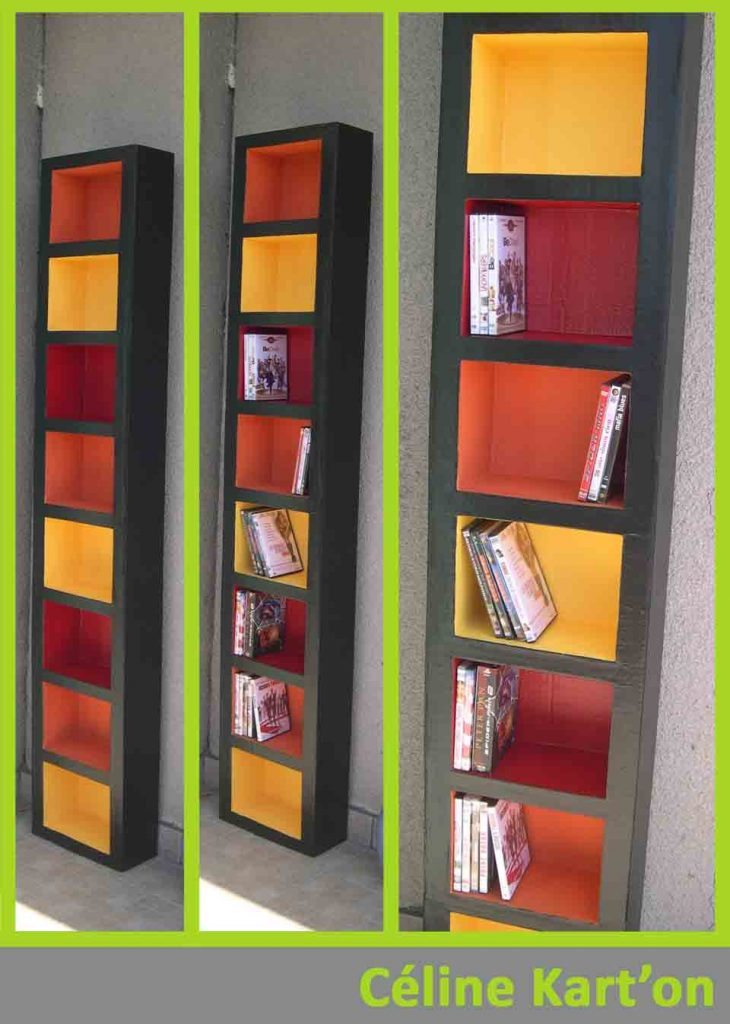
Today we will make a different thing. That is Cardboard Furniture. Amazing isn’t it?

To make cardboard furniture, you need three plates large enough cardboard to cut the furniture profiles. What is a profile, you say? These are the elements that make up the cabinet structure, which has the shape of the cabinet. Please draw the shape of the profiles on cardboard and cut them at least 3 for a 20cm wide cabinet.
- The first will be the furniture front.
- The second will be an intermediate profile (hidden in the cabinet).
- The third will be the cabinet bottom.
Over your furniture will be more profound, and you will realize middle profiles. I space profiles and a maximum of 10cm sleepers because the more the structure is more tightly it is resistant. Cut the sheets if you work with a knife by referring to the model on each plate. Suppose you own a jig-saw and stack three containers of cardboard that you hold together with kraft or Scotch to cut three sheets same time (this is a time saver, and three profiles will be precisely the same). Do not forget to number the profiles to remember their order in the cabinet structure once the furniture profiles are cut out niches on profiles 1 and 2. No, Profile 3 is the furniture bottom unless you want an open cabinet on both sides. Keep these pieces; they will serve you for making drawers.
The sleepers: The sleepers are pieces of cardboard composed of slots that can be clipped to profile # 2. Their length is defined by the depth of the cabinet, which is always the same. At the same time, their width may vary if the thickness of the structure changes.
For example: for my DVD library, the structure is 4cm thick on the furniture side, while tablets have a thickness of 3cm. So I cut crosses 4cm and 3cm wide.
Notches: Draw and cut notches on profile two and the cross. The cracks serve to interlock the webs of profile # 2, and the cross profiles can maintain them. They have a width equal to the thickness of cardboard and a height equal to half the width of the structure. If the structure’s thickness is 4cm, the size of the notch will be 2cm. I have about 10cm maximum spaces. We must reflect on their position because it is they who will consolidate and strengthen the furniture to the weakest point of the furniture. If you make a piece of furniture with different structure thicknesses, think of numbering the sleepers and tracking their position on profile # 2. once the notches cut profile # 2, see their positions on profiles 1 and 3 with the niche sites.
This will help you with the furniture’s squareness.


Snap all ties on the profile 2. Place on a flat surface profile 3, layer two profile with the cross, and finally, profile 1. The three profiles are perfectly aligned, arranged around the BD of furniture vertically companies open for squareness. To keep everything in place, divide the weight (bricks, market balance weight …) on the furniture. With a glue gun, paste on the cross profile three by depositing a stripe of adhesive on each side of the sleepers. When the glue is dry, turn the cabinet, handing out the three square profiles and the weight, to stick to the cross profile 1. Hot glue is liquid; it does not remain in the corners if you paste the cross profile on top.

Start at the bottom and the niche’s top and get to the sides. Take steps niches to cut pieces of cardboard adapted to the dimensions of the niche. Once you have cut and pasted the bottom and the top of the niche, repeat the steps to the side because the height of the niches has reduced the thickness of the cardboard that you just pasted.

When you have closed all the loopholes, you can close the cabinet’s sides, top, and bottom. If your furniture has rounded shapes, gently bend the cardboard in the same direction as the grooves.
It is time to remove small defects. Sand the board when it exceeds.
Then crafted the edges of the furniture. This allows for a nice finish for corners.

If you want to close the drawers, you must realize the drawers.
Measure each niche’s width, depth, and height, and build the first floor, the sides, and the bottom of the drawer. Allow the side height and width to be slightly smaller than measured in the niche dimensions. Otherwise, you can not insert the tray into the niche.
The drawer is almost finished, it only needs the drawer front. Repeat the stored songs after cutting niches in profiles 1 and 2. But you can also manufacture it in another completely different form.
Your furniture is finally ready for its final decoration. Two choices are feasible: handmade paper or acrylic paint. I’ll explain the second method. First, you must apply a first sub-layer; two solutions are available: 1- Apply an undercoat you realize is water-based and glue wood. The disadvantage of this underlayer is that if the card is poor, the gondola is. Or 2- Kraftez full furniture. An example of a table completely Kräfte:

Then, apply a coating that prepares the cabinet to receive paint. This coating is based on Whiting, water, linseed oil, and wood glue. You can find the recipe in the “Tips and Tricks”: Recipe Coated White Meudon. Apply two coats of this coating. Lightly sand after each coat when dry. An example of the coating furniture whiting:

You can paint your furniture according to your taste with acrylic paint. Paint you buy the paint section of your hardware store. Acrylic paint purchased in hobby stores is much more expensive and is sold in small quantities.

Finally, to protect your furniture, it must be vitrified. For this, use a parquet sealer aquarèthane colorless. The number of sealer coats you will use depends on your furniture use. Spend two or three layers on furniture surfaces that will be exposed to dust and splashing water … one is enough niches for hosting drawers. If you plan to be your furniture in a humid room (bathroom, kitchen, toilet), go with 4 or 5 coats of sealer. So your furniture can be cleaned like any other furniture.
courtesy: celine-kar-ton.over-blog


